Combining Different Stamp & Die Products | Concord & 9th, Spellbinders & Altenew
Hello there! It's great to have you back again!
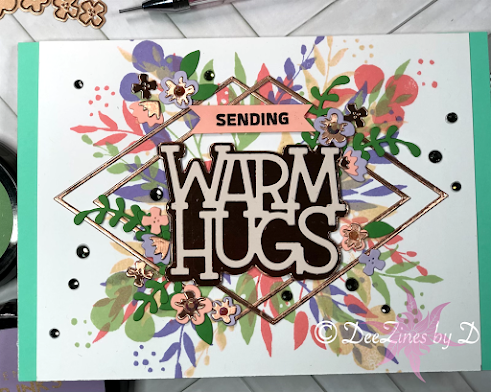
Today I wanted to combine some of the companies I love most into one card. They are not the only companies I love, but their products really worked with this card. I've had the C9 Botanicals Turnabout stamp for some time now but haven't had a chance to use it. And I thought that I might use some of the small floral dies from the Spellbinders sets that I have. And I just love some of the sentiment sets that Altenew has that I used on the inside of the card. So let's get to it!
If you would prefer to watch the video, go ahead and click below. Not to mention there are some additional tips in the video that are not in the write up here. If not, I'm going to try to summarize the steps below!
In my video, I did a round about way of stamping the turnabout (what a mouthful). I haven't used the turnabout stamps in a while and because I used a rectangle card front without a jig, I actually ended up turning my stamp instead of my cardstock. This makes the process a bit longer but if you happen to make the same mistake, this is the way to go!
- find the center of the 5" x 7" white card front (Neenah Exact Index 90lb white)
- Align the C9 Botanical Turnabout stamp on the template provided in the set
- Affix the cardstock to a stamp positioner then line up the template with stamp on the cardstock (stamp on top) such that the center of the X is on the center of your cardstock
- pick up the stamp with the lid of the stamp positioner and remove the template
- Use Altenew Coral Bliss, Hydrangea, Firefly and My Favorite Things In the Buff Inks (sorry, I cant seem to find this ink available anywhere) to stamp out the image while turning the stamp 90 degrees each time and lining up the template with the center of the cardstock just like before
Large Die Cutting
- Use the diamond from the C9 Botanical Dies to die cut out the shape twice from Sizzix Rose Gold cardstock
- Use the Simon Says Stamp Warm Hugs die to cut out the sentiment background from and the actual sentiment from Recollections Blush cardstock
- adhere the two die cuts together using Artist-tac Permanent Dry adhesive
Make Your Own Coloured Cardstock
- Take some Neenah Exact Index white cardstock pieces (preferable leftovers so you can use up your extra pieces) and apply Altenew Pink Pearl, Wisteria and Shadow Creek Ink to the cardstock in abundance
- let these pieces dry completely before use
Small Stamps and Dies
- Use a selection of small floral and leafy dies from the Spellbinders Hello & Thank You Small DOM September 2020 and from the Spellbinders Slimline Kaleidascope Hearts Large DOM January 2021 die sets
- Die cut out the floral and leaf fronds elements from the coloured cardstock made above and from Sizzix Rose Gold cardstock
- Assemble the florals individually with Simon Says Stamp Craft Tacky Glue and embellishment wand
- Use the "Sending Hugs" stamp from the Altenew Beautiful Inside stamp set to stamp out the "sending" portion of the stamp, by masking the "hugs" portion with washi tape, while inking up the stamp with VersaFine Clair Nocturn Ink
- remove washi tape and stamp onto the Pink Pearl cardstock just created
- cut down to size with the Tim Holtz Tonic Studios guillotine cutter (about 1/4'' on each side, left and right)
- Use fussy cut scissors to cut flag ends on Pink Pearl sentiment strip
Card Front Assembly
- Adhere the two rose gold diamonds to the card front in a staggered formation
- attach the Warm Hugs die cut and 'Sending" sentiment strip using foam squares
- Arrange small floral dies and leaf fronds around sentiments and adhere
-Add black diamond LolliBead gems to embellish
Card Inside Assembly
- cut 5' x 7' card base out of Hammermill Printer Paper 100lb Bright White and fold
- Stamp out inside sentiment from Altenew Say It With Love stamp set in VersaFine C|lair Fallen Leaves ink
- Add some extra floral and leaf dies to each side of inside sentiment
Final Assembly
-Cut two 1/2" strips of Mint Green Recollections Cardstock
- Attach each strip of green cardstock to card base with some Be Creative tape on both left and right sides
- Attach card front to card base with Be Creative tape
And that's about it! I hope I've inspired someone in some way or form. Feel free to leave a message if you see fit!


Comments
Post a Comment
Please leave me a comment as I always love hearing from you! 😃