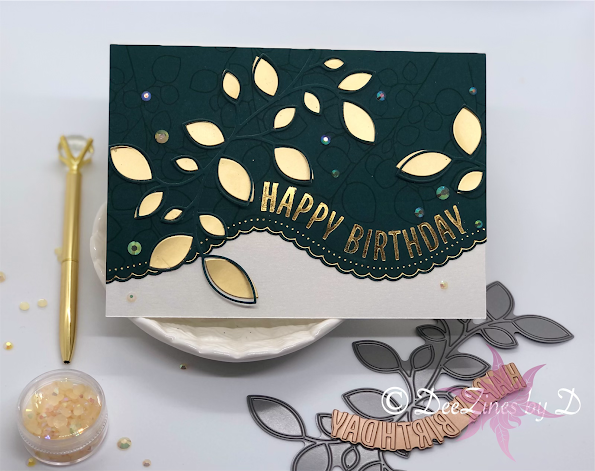
Masculine Leaves | Focal Point Die Cuts to Create Fluid Card Insides
Hello and welcome back to my blog!
Today I'll be using a large leafy die to create a focal point on the outside of my card, which I then also use on the inside of the card to tie in this leafy theme throughout the card. This creates one fluid theme for the card and using masculine colours help to make this an elegant masculine card. With Father's Day coming up I thought this was a nice design to share. I chose to make this a Birthday card but with the use of different sentiments, you can use this card for any occasion.
As usual, I have a video below for you watchers out there and if you prefer to read, you can continue on this page.
Card Front
I started with some foiling using my Spellbinders Glimmer Hot Foil System and some Green Promenade Deep Green Cardstock, sized 5" x 7" for my card front.
- Foil scalloped wavy border and Happy Birthday Sentiment from the Spellbinders Curved Glimmer Border & Sentiments glimmer kit using Spellbinders Polished Brass Foil about 1" up from the bottom of the cardstock, landscape orientation
- Use the Spellbinders Universal Curved Border Set to cut out the scalloped border
- erase any over foiling (TIP: If erasing dulls cardstock or foiled area, apply a small amount of Tim Holtz Distress Glaze with finger. Once dry the dulled areas are colourful/shiny again.)
- Use Altenew Leaf Canopy Stamp set to stamp out leaves in Altenew Hunter Green all over card front (this helps disguise any foiling errors)
- Cut out the focal point twice using the SSS Outlined Clustered Leaves die, once using the same Deep Green cardstock and again using Sizzix Opulent Gold Matte Metallic cardstock
- Glue the green leaf die cut to the card front (I used SSS Craft Tacky Glue), only attaching the main vines of the branch so that the leaf portions are left unglued (they can be lifted up)
-Glue on the gold leaf centers for each leaf, slightly offsetting the leaves
- set the gold leaf outline die-cut and green die-cut leaves for the card inside
Card Inside
- cut a matching card base from the Sizzix cardstock in gold pearl
- stamp sentiment on card inside using Altenew Say It With Love stamp set and VersaFine Clair Nocturne and Rain Forest inks (make sure to heat set sentiment with heat gun on this type of card stock to prevent smudging.)
- Adhere the gold leaf cluster outline die-cut to the inside of the card in the manner shown. This time adhere the entire die cut.
-Adhere the green leaf pieces to the inside of some of the outlined leaves and the rest around the leaf cluster outline to create a bigger bush/branch
Assembly
- Adhere the card front to the card base with some strong double-sided tape
- Make sure to adhere any extra leaf centers that may hang over the card front scalloped edge
-finish off the front with some PinkFresh Studios Jewel Mix embellishments
And that's today's card! I hope you are inspired and some of my tips were of use to you! Take care and see you again soon!
NOTE: I will be posting a part two of this type of card using the same leaf cluster die but in a bit of a different layout. I will not be making a YouTube video for this one so please subscribe to my blog if you would like to have a look at that one once posted! 😀


Comments
Post a Comment
Please leave me a comment as I always love hearing from you! 😃