Quick Cards with Washi Tape Die Cuts
Hello again and welcome to my blog!
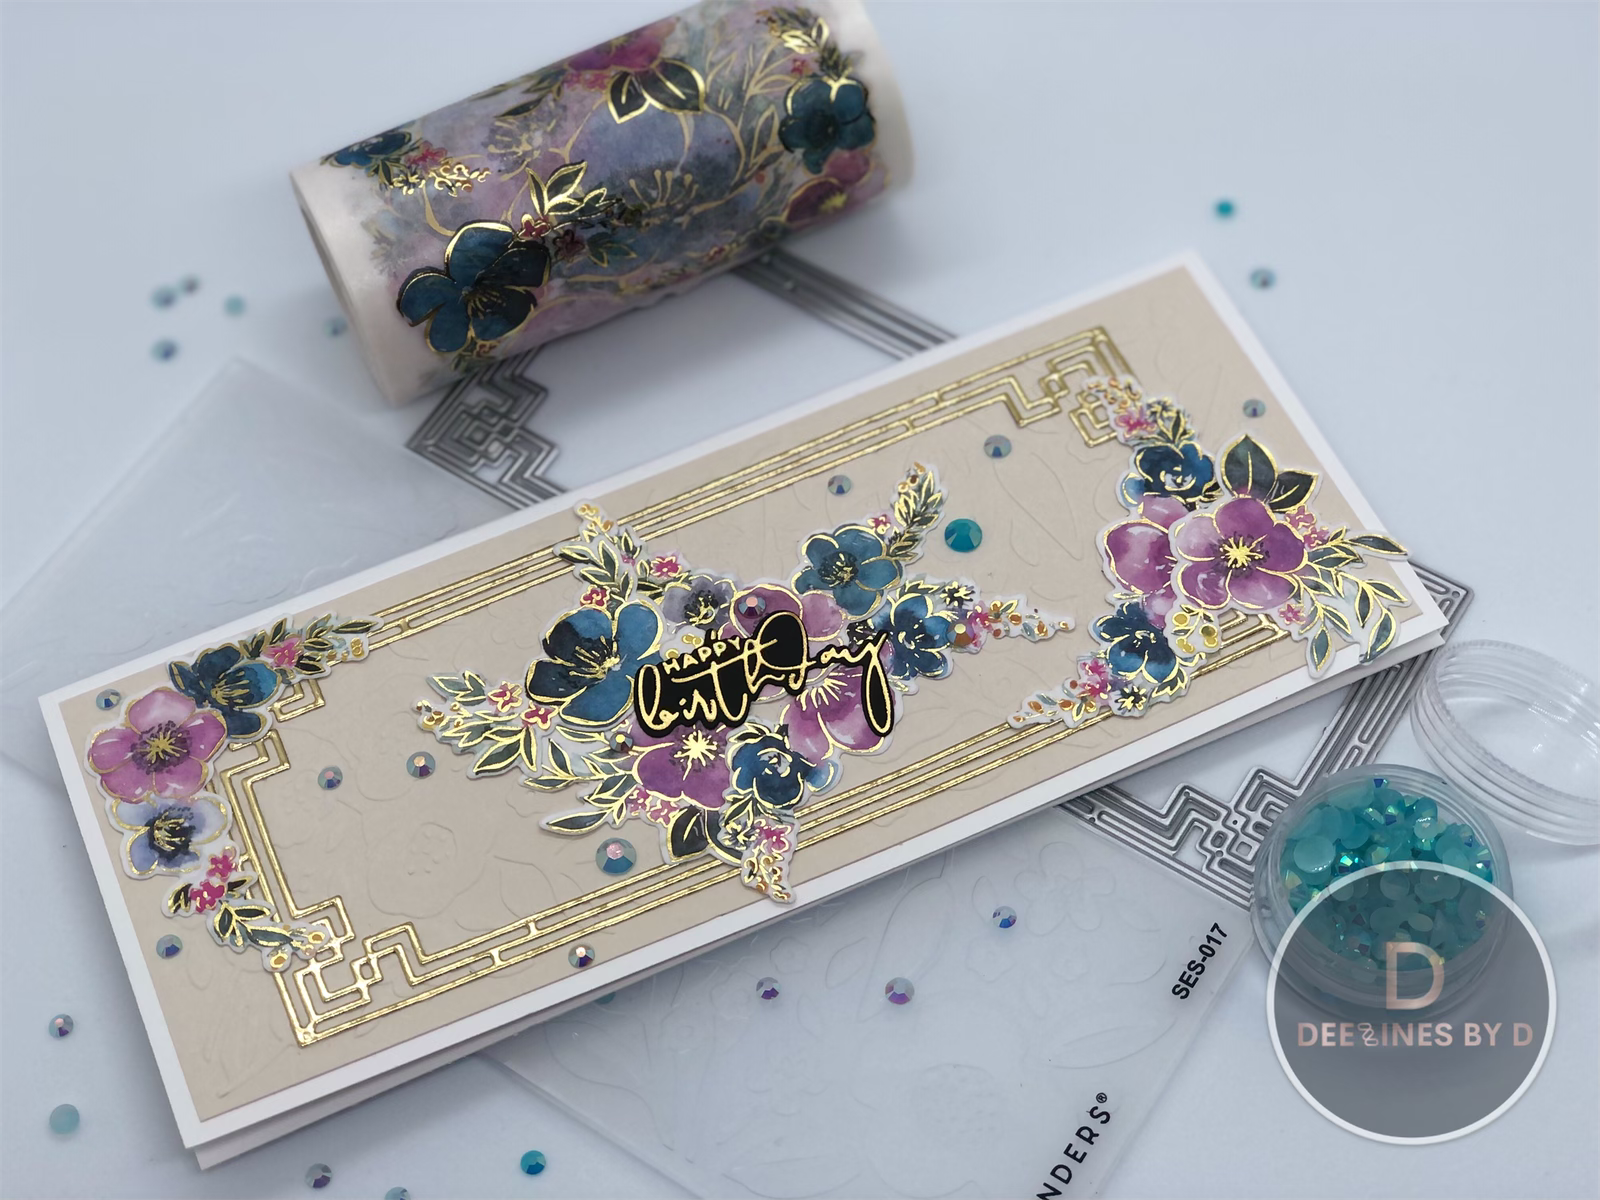
Today I wanted to show you a couple cards that I made with the PinkFresh Studios Anemone Magic Washi Tape and Dies. I absolutely love these products and they are my new go to for quick cards and scrapbook layouts! They are so easy to use and I almost bought everything!
As always, if you would like to watch instead of read, you can click the YouTube link below.
I started with laying out my washi tape on some Neenah Exact 110lb cardstock. I kept it thin so as to not make my card so thick for easy mailing. This is a nice broad washi tape and I love that it has beautiful colours along with some foiling. Once I got any bubbles out, I lined up my coordinating die and cut out all of the elements in one swift run through my Big Shot Plus.
I then used the Spellbinders Slimline Flora Embossing Folder to dry emboss a piece of Cream Recollections cardstock. I adhered this along with a die cut frame, cut using the Altenew Slim Deco Frames set with Sizzix Gold Metallic Mirror cardstock, to a corresponding white card base. (Make sure to keep the negative pieces of the die cut because we can use this for the inside of the card.)

I then arranged the die cut washi floral elements around the frame and in the center of the card front. I adhered these with BearlyArt glue and added a foiled "Happy Birthday" sentiment from the Spellbinder's Yana's Sentiments Glimmer Plate set, using Spellbinders Polished Brass foil on black cardstock. This set is nice because it comes with coordinating dies to cut out the sentiments. I then added some PinkFresh Studios Jewel Mix embellishments in light blue and white.

For the card inside, I tried to keep it simple. I used a sentiment from the Mama Elephant Inside Birthday Messages stamp set. I just go this from Simon Says Stamp and have been trying to look for more card inside sentiments to use. These are perfect for birthdays! I stamped this out with Nocturne VersaFine Clair Ink and then I used the scripty 'Happy Birthday" sentiment from the Honey Bee Stamps Birthday: Inside stamp set with some Nuvo Peach Blossom Hybrid ink.
I adhered some more of those beautiful anemone florals we cut out of the washi to kind of frame the inside of the card. And remember those gold negative die cuts I said to hang on to earlier? Well you can actually use those die cut strips to further frame the inside. I placed a few of these strips on the top and bottom of the card inside with some Artist-tac Dry Adhesive.


I then added a couple of the smaller florals in the empty corners. I added the same sentiment foiled in the same way but on white cardstock. And this time the embossing folder I used was the Simon Says Stamp Blossom Field embossing folder, which I recently happened to get my hands on in the SSS July Card Kit. (Unfortunately, I think this is sold out now but you can buy the folder separately. Furthermore, if you click my link to the folder, SSS actually lists the different types of sandwiches you can use depending on your die cut machine to get a good impression.) I finished it off with the same embellishments and again this card front took me no time at all!

That's all I have for today! I hope there was something inspiring in this post for you and feel free to leave a comment, as I love hearing from you!


- Altenew - Dies - Slim Deco Cover

- Price: $15.59


- Bearly Art - Precision Craft Glue - The Original

- Price: $14.99


What Beautiful, Gorgeous Cards. Thank you so much for doing a video. I love it when people do tutorial video's for I am a watch and do rather than trying to figure out what they mean when I try to read the directions. You are so Awesome!!
ReplyDeleteThank You Linda! I often make them and wonder who is actually seeing them. I can't tell you how much I really appreciate your comment !! Have a great day and stay crafty! :)
Delete