Spellbinders Merry Wishes Card Kit | 5 Quick Cards
Hello Everyone!
Today I have an oldie but a goodie! So at the end of last year I purchased a few Spellbinders Christmas card kits in preparation for this year's festive season. I did notice that some of the kits, including the Merry Wishes card kit which I'll be using today, are still in stock and occasionally go on sale. These are great kits for making many cards but I'm just going to show you 5. Be assured you can make way more than this!
VIDEO
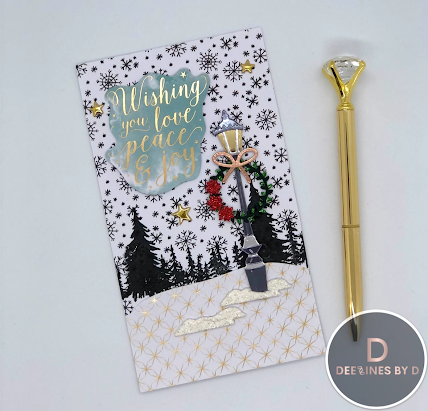
For 4 of these cards, I simply used the patterned paper included in the kit and added the ephemera and chip board stickers as desired. On the 5th card, I used the die set that comes with this kit to create the lamp post for a mini slimline card. On two of these cards, I chose to use the Spellbinders Merry Christmas Wishes November 2020 glimmer kit to foil the sentiment for the card. And for 2 of these cards, I used the blank cards supplied in the kit to make an A2 sized card. So this shows you that you can use the cards in the kit yourself or you can use you own card bases in any desired size.
Here are some more detailed instructions of each card (numbered in the below picture):
1) - Adhere gold stripe and red spotted pattern paper to 5" x 7" card base- add "it's the most wonderful time of the year" card to center- add various ephemera around card with glue and foam squares- Add Season's Greetings piece with foam squares- embellish with gold sequins from kit and clear gems (from dollar store)
2) - use Sizzix Opulent cardstock in charcoal, ivory, rose gold and gold to die cut lamp post dies and assemble with BearlyArt glue and jewel picker. Attach wreath (from Recollections cardstock), flowers (from Darice Core'dinations red glitter cardstock) and bow.
- Adhere snowflake pattern paper to 3 1/4" x 6 1/4" card panel with Tombow Mono Dot Runner
- use individual tree and row of trees stamps from kit to stamp out images with VersaFine Clair Nocturne Ink
- attach second piece of gold start pattern paper (cut into snow mounds) to bottom of panel
- Adhere the lamp post, glitter snow mounds and sentiment ephemera with foam squares
-embellish with a few gold puffy start stickers from kit
3) - Adhere woodgrain pattern paper to A2 sized card supplied in kit
- adhere in layers the holly card piece, red and white striped tag, and Christmas tree ephemera on top of each other
- Adhere sentiment ephemera with foam squares and adhere poinsettia + wood ephemera piece with glue
- Add gold star puffy sticker on tree top and jolly chipboard sticker to left side of card
- embellish with gold sequins from kit and clear gems (from dollar store)
4) - Adhere black and white Christmas script pattern paper to A2 sized card supplied in kit- Glimmer "Christmas Wishes" plate from Spellbinders Merry Christmas Wishes November 2020 glimmer kit with Spellbinders Aura Foil on white cardstock- Adhere foiled sentiment piece to bottom of card- adhere wreath, candy cane and branch ephemera to center of black background- add ribbon/bow chipboard sticker to candy cane and bird with foam squares-embellish with large and small sticker gems (from dollar store)
5) - Adhere red pattern paper to 5" x 7" card panel
- Glimmer "Merry" ornament plate from Spellbinders Merry Christmas Wishes November 2020 glimmer kit with Spellbinders Aura Foil on white cardstock
- Add ephemera Christmas sentiment to bottom of card with foam squares and add branch ephemera around sentiment
- Add house and globe ephemera to center
- embellish with gold puffy star stickers and large and small clear gem stickers


Comments
Post a Comment
Please leave me a comment as I always love hearing from you! 😃