Layering Stencils | Make The Cards Challenge 41
Happy Wednesday!
This week's Make The Cards Challenge 41 post is a sketch challenge! These are fun to do because they basically lay down the framework for the card and you can interpret it however you want! I chose to use a layering stencil and focus in on certain areas of the image for the card front and inside. I'll show you how to get a variation in looks just by adjusting the pressure on your ink blending! And if you watch my YT video, I also have a couple sneak peeks of Pinkfresh Studio products (not released yet) that I was privy to since I took part in their Create & Connect event this past weekend! So make sure to watch the full video 😉!

Challenge Post

Watch the Video on YouTube

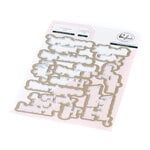
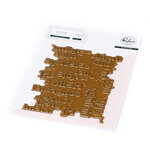
For this card, I pulled out a bit of an older layering stencil set by Pinkfresh Studio, the Heartfelt Thanks set. This is going to be a Pinkfresh heavy post since I just attended their retreat this weekend and I'm blown away by this company and their efforts! So back to the card, I took a panel of white cardstock (4- 1/4" x 11") and I lined up the first stencil which was the largest flower layer. You can do this many different ways including lining this up in your MISTI (if you have the scrapbook one) and this lines up your stencils perfectly every time, as long as you use the same corner to put in the corner of your stamp positioner (I will be demonstrating this in future videos). This time I just simply taped my stencil to my cardstock and lined it up visually each time. Since I'm using a no-line effect and just ink-blending, I don't have to perfectly line it up. I ink blended my layers in the following manner:
Layer 1 of flower - Altenew Blush ink
Layer 2 flower detail - Altenew Rouge Ink
Layer 3 flower detail - Altenew Canyon Clay & Crimson ink
Layer 4 leaves - Altenew Minty Mint ink
Layer 5 leaf detail - Altenew Sweet Leaf ink
So I ink-blended these with medium to heavy pressure because I wanted the image to stand out on the front of the card. Next I used the Pinkfresh Studio Stitched Scallop Rectangles die to cut out a from from dark red cardstock. I placed the inside portion of the fame (since this cuts 2 frames) on my stenciled image and decided which portion of it I wanted to use. I then measured the size of the panel I would need against an A2 sized card base, keeping in mind that I will be leaving a bit of space a the bottom of the card like the sketch image. I used a scallop die to cut only the bottom of the image and lined this panel up with my card base to cut it to size on all other sides. I then used the Pinkfresh Studio Stitched Scallop Rectangles die again to cut out the frame 3 more times from black cardstock. One tip I picked up from the retreat this weekend is to build up your dies to add dimension. And once you try it a few times you realize how nice it is and how cost effective it is to do this as opposed to using foam tape (more expensive than cardstock). Needless to say, I stacked these black frames with some Bearly Arts glue and put the dark red frame on the top, which creates a nice chip board frame.

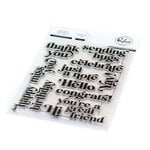
I used a scallop circle die to cut out a piece from vellum. My die actually shifted in my die-cut machine while cutting this so it cut off the edge but I decided to still use this, as I would've had to cut this off of my card anyways. I also had a "Just a note" foiled sentiment hanging around in my pre-foiled and cut sentiment stash that I chose to use for this card. It was foiled with Spellbinders Rose Gold Foil using the Pinkfresh Studio Perfect Sentiments plate and die. I've mentioned before that I like to foil and cut these in one go with Pinkfresh products because they make it so easy to do and it helps when making quick cards!
Next I assembled the card front as in the sketch image. I adhered the stenciled cardstock onto some dark red cardstock, cut to 4 - 1/4" x 5 - 1/2", leaving some red cardstock showing at the bottom. I then adhered the built up red frame with Bearly Arts glue. I adhered the sentiment to the vellum circle and then to the card front with glue and foam squares, making sure to hide my adhesive behind the sentiment. I then finished off the front panel with some beautiful Pinkfresh Studio Champagne pearl embellishments. Now, these are part of my sneak peek because I got this with my Create & Connect event kit. They are so beautiful and work with so many projects but they wont be available until December, so look out for these in future Pinkfresh releases!

For the inside of the card, I did some more ink blending with these stencils but this time I used a lighter hand while stenciling. This creates a beautiful watermark effect and gives you a lightly coloured image to continue your design on the inside of the card! I'm absolutely in love with this light ink blending technique which is also something I picked up this weekend from Carissa Wiley, who is a Pinkfresh Studio Design Team Member! I added ink to a portion of the stencil in the left bottom corner of the card in the following manner:
Layer 1 of flower - Altenew Blush ink
Layer 2 flower detail - Altenew Rouge Ink
Layer 3 flower detail - Altenew Rouge Ink with a bit of a heavier hand
Layer 4 leaves - Altenew Minty Mint ink
Layer 5 leaf detail - Altenew Minty Mint ink with a bit of a heavier hand
Once you remove your stencil and see these results you are going to love this method too! I also have another sneak peek of the Pinkfresh Studios In The Meadow stamp and washi! There are stencils as well but I didn't have them handy in my video. This is another suite that is beautiful and the stamp set comes with a lovely "Thank You" sentiment that I just had to use! I stamped this out in some Versafine Clair Nocturn ink to finish off the inside of my card. So keep in mind this set won't be available until a later date!
After adhering the card front onto the card base, my card was complete! So please go ahead and grad your stencils and try these methods out! It's crazy how you can get such different looks with the same products just by adjusting your ink blending and hand pressure while blending!
Furthermore, I encourage you to check out the rest of the designer's inspiration and create your own card to link up to the challenge page for a chance to be this week's winner.
As always, thanks for stopping by. And don't forget to leave me a comment, as I love hearing from you!

Supplies
(note: Any products not included here are linked within the blog text)

- Pinkfresh Studio - Dies - Perfect Sentiments
- Price: $15.28


- Pink and Main - Dies - Scallop Circle

- Price: $19.78
- Pink and Main - Dies - Scallop Rectangle

- Price: $19.78
- Tsukineko - VersaFine Clair - Ink Pad - Nocturne

- Price: $7.91
- Bearly Art - Precision Craft Glue - The Original

- Price: $14.99

- Journey Vellum

- Price: $9.95
- Lisa Horton Crafts - Ink Blending Wonder Brushes

- Price: $24.99
- Spellbinders - Glimmer Hot Foil System
- Price: $107.88


Thank you Dottie! I definitely will!
ReplyDelete