Different Methods to Add Ink to Die Cuts | Christmas Bouquet
Hello Crafters and Welcome back!
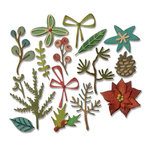
Today I have a heavily die cut card for you. I saw an image of a Christmas bouquet and was inspired to create this beautiful card. I will be doing a lot of die-cutting but I will only be using white cardstock, which makes it easier. Then I will show you how to add ink in various different ways to get a gradient look! Any of these methods work and you can choose what works best for you. Yes, the die-cutting takes time but the assembly is so fun and the final result is so worth it!

Watch the Video on YouTube

Step 1: Die-Cutting
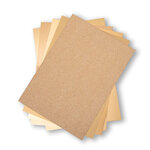
So the only colour cardstock you will need is white! Use your die-cutting machine and cut to your hearts content as follows:
Altenew CAF Daffodil - first 4 layers 3 times
Altenew CAF Dendrobium Orchid - first 3 layers twice
Altenew Layered Florals - wispy leaf branch 6 times
Altenew CAF Cosmos - any 4 leaf branches
The rest of the images will be cut after adding ink to the to the white cardstock.
Step 2: Adding ink to the Daffodil and Orchid & Assembly
For the Daffodil, I used some washi tape sticky side up to attach each layer of the flower and add ink with a blending brush. I added Altenew Rouge, Crimson and Velvet ink concentration the colour in the center of the flower. For the fourth layer, I used velvet ink again and just added a generous amount to create a darker hue. Then I used some Artist-tac dry adhesive to assemble each of the 3 flowers using the packaging as a guide. You may notice that I did not add the centers of the daffodils and this is because I want these to be open red flowers somewhat like poinsettias.
For the Orchids, I kept the negative piece of the cardstock and added washi tape to the back so the sticky side would show through. I then inlayed the die cuts and added my ink concentrating the colour n the centers. I added Altenew Citrus Burst, Fresh Lemon and Honey Drizzle to the 3 layers and assembled them using the guide and Bearly Art glue. Again, I did not use the centers of these orchids so I could create a different looking wispy yellow flower. So this is how you can use these layered flowers to customize and create your own look!
Step 3: Adding ink to the leaves, twigs, pine branches and small poinsettias
I chose to use the leaves in the Altenew CAF Orchid set but this time I added ink to the white cardstock first. I added Altenew Frayed Leaf and Evergreen inks to the cardstock with a blending brush. I used the die to estimate the area that I would need to cover with ink and again concentrated my colour where the center of the die would fall. Then I added my die and cut the leaves out. They end up with the same look as the 2 methods above but you may find this method easier for you.
I used this same method with the following combinations of ink and dies:
Altenew Floral Elements -Altenew Espresso ink & twig die
Spellbinders Christmas Blooms - Altenew Mountain Pine ink & pine branch die, Altenew Hunter Green and Shadow Creek ink & holly leaf dies, Altenew Coral Bliss & poinsettia dies
Sizzix Funky Festive Dies - Altenew Pink Pearl & Branched shrub die
For the Cosmos leaf branches and the Altenew Layered Florals wispy leaf branches, I simply put the dies back into the negative die cut space and added Altenew Bamboo & Shadow Creek ink and Silver Stone ink, respectively.

Step 4: Background
Once all the die cuts are cut, inked up and assembled, I cut a 4.75" x 6.75" panel from Deep Sea Blue cardstock. I used the Spellbinders Essentials Christmas Greetings plates to foil a sentiment near the bottom center of the panel in Spellbinders Aura Foil. I also foiled some pine and berry branches from the Spellbinders Holiday Florals plate set using the same foil. I strategically placed these so the would show up at the bottom of the bouquet as if they were part of the arrangement.
Step 5: Assembly of Bouquet & Bling
So this, in my opinion, is the most fun!! I first arranged the largest flowers and adhered them with foam squares. This part is important since a single foam square allows you to add leaves, tucking them behind the flower and facilitates the creation of the bouquet. I do not recommend using Press N Seal, as this bouquet is huge with many layers and it may not pick up everything. Then I could cut and add branches, leaves, hollies, poinsettias all around the larger flowers with Bearly Art glue.
Once I had everything where I wanted it, I cut off any pieces that were hanging too far off the edge of the panel. If I felt it would fit within the 1/8" border of the card, I left it for interest. Then, I added another poinsettia just below the sentiment and added Nail Art Gems and PinkFresh Studio Peach Fuzz jewels for the branch berries, flower centers and scattered around the entire bouquet.

Step 6: Card Inside
So now all I have left is the card inside. I used a 1" strip of the same Deep Sea Blue Cardstock and a smaller strip of Sizzix Opulent Gold Pearl Cardstock. I adhered them to create a border with 1/8" Scor-Pal Tape and then attached it to the bottom of the 5" x 7" Top Folding card on the inside. I then used the leftover die cut pieces and cut off pieces from the front panel to arrange a small floral element in the bottom left of the card inside on top of the blue and gold border. I used my Altenew Warm Blessings Stamp set to stamp out a sentiment using my masking method and VersaFine Clair Nocturne ink and Altenew Coral Bliss Ink. I also added a small sentiment from the Simon Says Stamp Joyful Season stamp set.
Finally, I attached my card front to the card base and I was done!
So this one took a bit longer but I love how it turned out! I realize this design may seem too labour intensive or look too busy for some, but I like it! Do you? Let me know in the comments!
Thanks for stopping by and stay crafty!😊


- Altenew - Dies - Layered Floral Elements

- Price: $23.39
- Altenew - Clear Photopolymer Stamps - Warm Blessings

- Price: $15.59
- Scor-Pal - Scor-Tape 1/8" x 27 yds

- Price: $3.59

- Bearly Art - Precision Craft Glue - The Original

- Price: $14.99

- Altenew - Layering Dies - Craft A Flower - Daffodil

- Price: $35.09
- Altenew - Layering Dies - Craft A Flower - Cosmos

- Price: $35.09

- Lisa Horton Crafts - Ink Blending Wonder Brushes

- Price: $27.10
- Spellbinders - Glimmer Hot Foil System
- Price: $105.48


i LOVE the look of heat emboss-makes all the difference!
ReplyDeleteGreat job as usual.
ReplyDelete