Dressing Up Your Background Stencils | Die Cuts, Embossing Powders & Pigment Inks
Merry Christmas and Happy Holidays!
I've been taking a bit of time off to do some traditional activities with the kids, so I made this final Christmas post to share with you on Christmas! I hope everyone is having a nice time with family and friends, as I am. These final Christmas cards for 2021 feature the PinkFresh Studio Holiday Botanical Background stencils and I'll show you how to dress these stencils up with some die cuts, embossing powders and pigment inks for a few different looks! Be sure to save the pin below to your Pinterest boards so you can refer back next holiday season for inspiration!
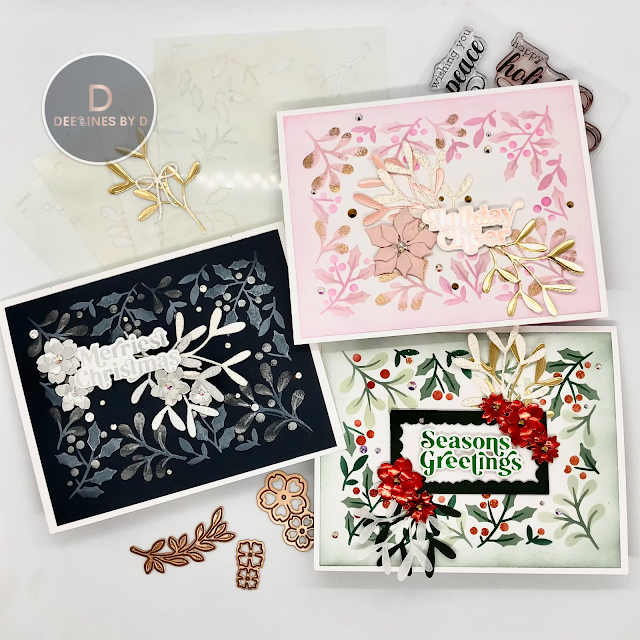

These stencils are pretty simple to use and always give great results. For all three cards, I lined up each stencil, fastened it down with some washi tape and added ink with my blending brushes as follows:
Card 1
Stencil 1 - Vines - Altenew Baby Pink Ink
Stencil 2 - Hollies - Altenew Pink Diamond Ink
Stencil 3 - Mistletoe -Altenew Rose Quartz ink
Stencil 4 - Berries - Altenew Pinkalicious Ink
Card 2
Stencil 1 - Vines - Pigment Craft Co Balsam ink
Stencil 2 - Hollies - Pigment Craft Co Juniper ink
Stencil 3 - Mistletoe -Pigment Craft Co Lagoon ink
Stencil 4 - Berries - Altenew Heart Beat Ink
Card 3
Stencil 1 - Vines - Hero Arts Unicorn White Pigment Ink
Stencil 2 - Hollies - Hero Arts Unicorn Pastel Mint Ink
Stencil 3 - Mistletoe - Encore Silver Metallic ink (light pressure)
Stencil 4 - Berries - Encore Silver Metallic ink (heavy pressure)
Then to add a little more to the first two cards, I added Altenew Rose Gold embossing powder to the edges of the mistletoe leaves and Ranger Holographic embossing powder to the entire image on the green inked card. This just adds a bit of shine to the card.


I cut all 3 panels down leaving about a 1" border around the stenciled image (creates a 5" x 6" card). Then I also added some light ink blending around the edges of the cardstock in Altenew Pinkalicious and Pigment Craft Co Juniper inks.
Next, I used the C9 Mistletoe Messages mistletoe die to cut out some fronds from various cardstocks and vellum to match each card. I also used the Spellbinders Petite Floral Potpourri dies to cut out some leafy branches and flowers. I had my stash of pre-foiled and cut sentiments that I made with the Pinkfresh Studio Holiday Sentiments plate and die. I used the Season's Greetings (foiled in Spellbinders green foil), Holiday Cheer (foiled in Spellbinders Blush Foil) and Merriest Christmas (foiled in Spellbinders Silver foil) sentiments.
For card 1 (pink card), I placed the mistletoe pieces where I wanted them and then adhered the sentiment with foam squares. I then stuck down the centers of the branches more with my BearlyArt glue. I attached a pink poinsettia made with the Spellbinders Layered Poinsettia dies.
For card 2 (green card), I did some partial die cutting to create a smaller rectangle frame from dark green cardstock using the smaller die from the PinkFresh Studio Slim Stitched Scallop Rectangle dies. I added the florals and mistletoe pieces in the same fashion as before as well.
For card 3 (blue card), I arranged the mistletoe and floral die cuts and adhered them where desired as I did in card 1 and 2.


Finally for the front, I added some Nail Art gems in the flower centers and around the background.
For the insides of these cards, I placed a piece of Post-It tape to create a straight edge on the bottom of these top folding 5" x 6" cards. I added Altenew Pinkalicious, Pigment Craft Co Juniper ink and Distress Oxide Chipped Sapphire ink to create a 1" bottom border. I concentrated the ink where the line begins and lightened it as it reaches the edge of the card. I added 1/8" strips of Sizzix Opulent Ivory Glitter cardstock to where the colour meets the white of the card. And I added some extra floral and leaf die cuts on the bottom left of the card inside.
For the sentiments, I used my masked stamping method to stamp out sentiments from the Altenew Warm Blessings stamp set. Again, I used Versafine Clair Nocturne ink for the printed portion and Altenew Pinkalicious, Altenew Heart Beat ink and Distress Oxide Chipped Sapphire inks for the scripty portions.
Lastly, I attached the card fronts to the card bases and these cards were complete. The stenciling was simple and did not take so long while the die cutting took a bit of time but allowed these cards to come together in the end!
I hope you have been inspired and as always, thanks for stopping by. Please don't forget to leave me a comment, as I love hearing from you!


- Mistletoe Messages dies

- Price: $20.00


- Altenew - Clear Photopolymer Stamps - Warm Blessings

- Price: $15.59
- Tsukineko - VersaFine Clair - Ink Pad - Nocturne

- Price: $8.57
- Bearly Art - Precision Craft Glue - The Original

- Price: $14.99

- Embossing Powder Holographic, 1oz Jar

- Price: $4.99


- Lisa Horton Crafts - Ink Blending Wonder Brushes

- Price: $27.10


Comments
Post a Comment
Please leave me a comment as I always love hearing from you! 😃