Making Background Stamps Pop | Make The Cards Challenge 46
Hello Crafters!
This week's Make The Cards Challenge 46 is a theme challenge and we want to start 2022 with some encouragement cards! Effective this year, there will be a new Make The Cards Challenge twice a month on Wednesdays. So great news - you will have some extra time to join in!
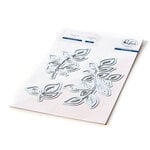
Today's card features a beautiful background stamp from PinkFresh Studio and I will show you how you can add various elements to make your background stamps pop!

Challenge Post

Watch the Video on YouTube

Like what you're seeing? Pin this picture for later on Pinterest!
So one of my New Year's resolutions is to keep it short. I tend to add a lot of verbiage and it is a lot to read, so I'm going to try and write out some step by step instructions this year, in the hopes of being more concise and saving some time!
1. Stamp out PinkFresh Studio You Are Amazing Slimline stamp with Spectrum Noir Flagstone ink (alcohol ink safe)
2. Use Copic Ciaos (BG09, G17, G21) to colour in leafy background using flicking technique
3. Use PinkFresh Studio Essential Blanket Stitched Slimline Rectangle die to cut out background
4. Use PinkFresh Studio Mini Slimline Builder Dies to cut out a smaller rectangle from the center of the background
5. Use another rectangle and circle dies from the same set to cut out 1 smaller rectangle from vellum and 2 circles from white and Sizzix Gold Mirror cardstock
6. Heat emboss the sentiment from the PinkFresh Studio English Garden stamp set in Altenew Rose Gold embossing powder on the white circle
7. Adhere the white circle to the gold circle in an offset fashion
8. Use the flower die from the Spellbinders Santa's Fireplace LDOM to cut out a bunch of flowers from cardstock coloured with Altenew Coral Bliss ink

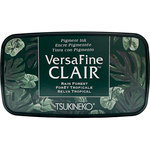
9. Cut out the slimline card base (8.5" x 3.5") and use the You Are Amazing stamp on a large acrylic block to stamp the bottom left and top right corners of the card inside with VersaFine Clair Warm Breeze and Rain Forest ink
10. Stamp out the sentiment from the Altenew BAF Hyacinth Stamp set with VersaFine Nocturne ink
11. Adhere the larger rectangle background frame to the front of the card along
12. Adhere the smaller rectangle frame (lined up to create a continuous image) with a layer of fun foam underneath
13. Adhere the smallest vellum rectangle with foam squares in the center and the circle sentiment piece adhered on top
14. Add vellum cut PinkFresh Studio Curvy Leaves pieces around circle with BearlyArt Glue
15. Add the die cut flowers all over background and on circle sentiment (and on the inside of the card)
16. Use AB Crystal Nail Gems for flower centers and PinkFresh Studio Sparkling Champagne Metallic Pearls in center of card

So with that, I added more pizzazz to this card by propping up the center rectangle with fun foam for dimension, by adding the die cut flowers in another colour for contrast and by adding the vellum elements that allow the background to show through in a mute fashion.
I hope these ideas will work for you too and that you can make your backgrounds pop as well!
I hope that you have been inspired!
I encourage you to check out the rest of the designer's inspiration and create your own card to link up to the challenge page for a chance to be the challenge winner.
As always, thanks for stopping by. And don't forget to leave me a comment, as I love hearing from you!

Click to see the video short on Instagram!☝
Supplies
(note: Any products not included here are linked within the blog text)
- Pinkfresh Studio - Dies - Curvy Leaves
- Price: $14.06

- Bearly Art - Precision Craft Glue - The Original

- Price: $14.99

- Copic - Ciao Marker - Blue Green - BG09

- Price: $3.90

- My Sweet Petunia - MISTI Stamping Tool - Original

- Price: $60.00
- Copic - Ciao Marker - Lime Green - G21

- Price: $3.90
- Copic - Ciao Marker - Forest Green - G17

- Price: $3.90
- Tombow - Mono Adhesive Dots - Dispenser

- Price: $5.79
- Journey Vellum

- Price: $9.95
- Spellbinders - Dies - Christmas Blooms

- Price: $17.59


- Ranger Ink - Basics Embossing Powder - Gold

- Price: $4.74


BEAUTIFUL card and I love the sentiment! Nicely done my friend!!
ReplyDeleteThank you Darlene!
DeleteSuch a gorgeous card. Love the added vellum and how you carried the design over to the inside.
ReplyDeleteThanks Allisa! Glad you like it! 🙂
DeleteAbsolutely beautiful! I love that you finish the inside of your cards too! Thank you for being part of the MTCC family!
ReplyDeleteThank you Jill! And thanks for having me 🙂!
DeleteStunning coloring and fantastic video! Thank you so much for sharing your beautiful card and I'm thrilled to be working with you at MTCC.
ReplyDeleteThank you Cindy! The feeling is mutual! 😃
DeleteBeautiful card, I love how you colored the leaves. Also thanks for the great tip for "larger-than-the-Misti" stamps, I have a couple that I will have to try that with!
ReplyDeleteThank you Melanie! 🙂 I’m so glad you were able to find the video useful. The idea is genius and I saw a PinkFresh team member do it, so I had to share!
Delete