Foiling on Coloured Cardstock | Make The Cards Challenge 48
Hello Crafters!
This week's Make The Cards Challenge 48 is a sketch challenge and I love these challenges because you can interpret and alter the sketch in any way you'd like to make a unique project! I decided to make my card landscape version of the sketch.
I chose to do some foiling on white and coloured cardstock. I know you may be apprehensive about using different cardstocks to foil but I have a few quick tips that will help you pick appropriate coloured cardstock and/or make what you have work for you!

Challenge Post

Watch the Video on YouTube

Like what you're seeing? Pin this picture for later on Pinterest!
Instructions:
1. Use the PinkFresh Studio Folk Garden 2 foil plate to foil a 4 1/4" x 5 1/2" piece of white and teal cardstock with Spellbinders Silver foil on the teal and Spellbinders Teal Foil on the white
Here are a few tips for foiling on coloured cardstock:
- try and pick a smooth cardstock
- adjust your shims based on the thickness of your coloured cardstock
If you want to use the coloured cardstock you already have...
- let your glimmer machine heat up for longer than just getting the green light to say it's ready
- Place the plate, cardstock, shim and spacer pad on the machine while it counts down
- Once the timer is up wait 2 extra minutes
- Roll the heated sandwich through your die-cutting machine very slowly
- Roll it through once only (going back and forth can cause a double image of the plate shifts)
- Use a sand eraser or Couture Creation Detailer Tool to erase any over foiling
Using these tips should really help to get a nice crisp foiled image and please keep in mind that you may not have to use all 8 tips! Find the right recipe that works for you and your supplies/machine. It is really all about experimentation.

3. Use small square die to cut out 3 desired areas on the white foiled + inked cardstock. Matte the 3 squares on some vellum with a 1/8" border
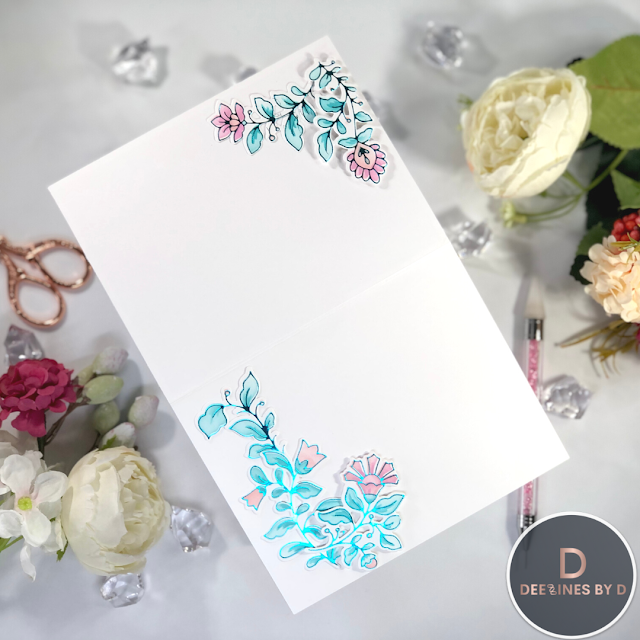
4. Cut out the rest of the images on the white foiled + inked panel with the coordinating Folk Garden Die and set aside for the card inside.
5. Cut a 3/4" - 1" strip of pink/purple shiny cardstock from the Tim Holtz Metallic Jewels Kraft Stock pad.
6. Cut the Teal foiled background to create a 1/8" border when placed on an A2 sized card base (approximately 4" x 5 1/4")
7. Cut an A2 sized top folding white card base and arrange those die cut pieces from step 4 on the bottom left and top right of the card inside. I used some Bearly Art glue and foam squares to adhere the pieces.
8. Adhere the pink metallic strip to the teal foiled background with foam tape. Adhere the 3 squares spaced out like the sketch on top of the strip with liquid glue.
9. Arrange some of the extra die cut pieces from step 4 behind the Thank You sentiment (previously foiled in Spellbinders silver foil using the PinkFresh Studio Sentiments plate and die). Prop some up with foam squares.
10. Adhere with strong double sided tape the acetate butterfly foiled with Spellbinders Aura Foil and the PinkFresh Studio Small Butterflies plate and die. I had this leftover from another project.
11. Adhere the panel to the card base and embellish with PinkFresh Studio Glacier Jewels and AB Clear Nail Art Gems.
And that's my sketch card inspiration for today! I hope that you have been inspired and can hopefully use some of the tips I've shared for foiling.
I encourage you to check out the rest of the designer's inspiration and create your own card to link up to the challenge page for a chance to be the challenge winner.
As always, thanks for stopping by. And don't forget to leave me a comment, as I love hearing from you!

Click to see the video short on Instagram!☝
Supplies
(note: Any products not included here are linked within the blog text)


Gorgeous card, love the elegant look with the foiling!
ReplyDeleteThank You Allisa!!
Delete