Gift Bags & Tags | Spellbinders Celebrate You Collection
Hello Crafters!
I'm so excited to be able to share these beautiful new Spellbinders products with you from the Celebrate You Collection available in the Spellbinders' store now! I have a few gift bag ideas to share with you today along with a second post for this collection tomorrow! So stay tuned!
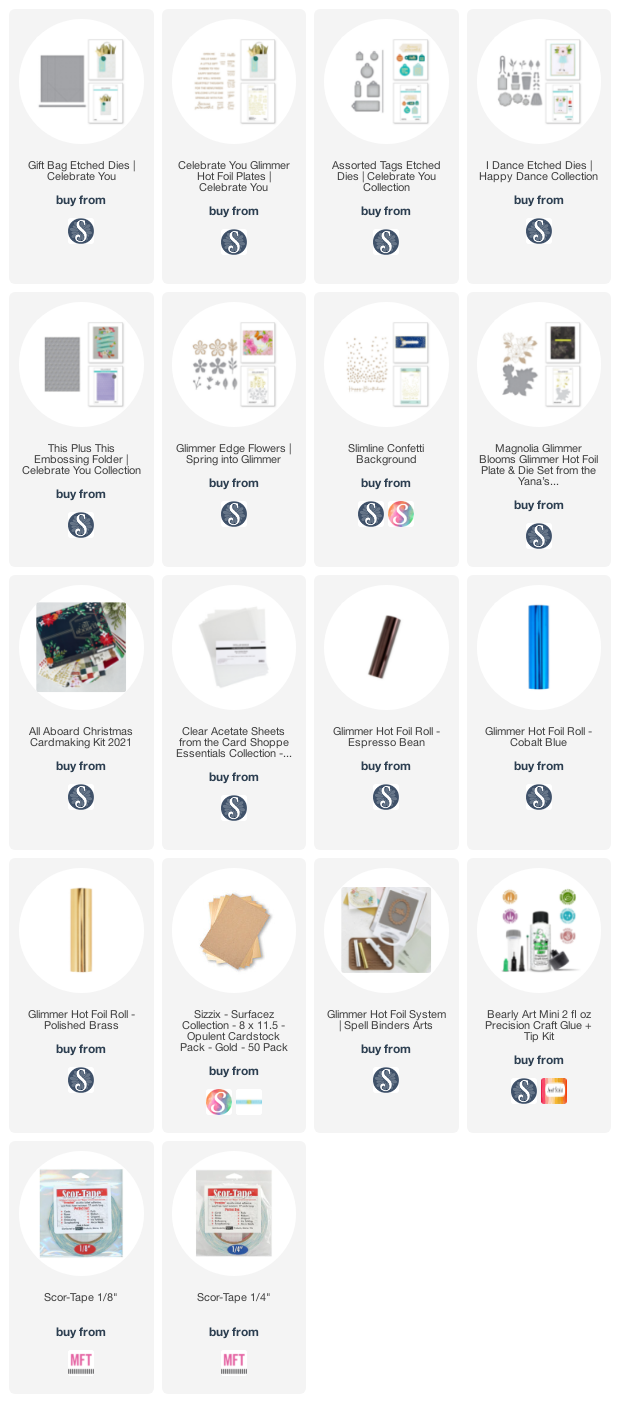
All of these products can be found in the product list at the end of this post. Please feel free to click and shop. These are affiliate links, meaning that if you click on them and purchase something, I will earn a small commission at no additional cost to you. It simply helps me keep bringing you more inspiration! I appreciate any and all support - Thank you! 💜
I've included a YouTube Video Tutorial below, if you are interested!
Watch the Video on YouTube

Like what you're seeing? Pin this picture for later on Pinterest!
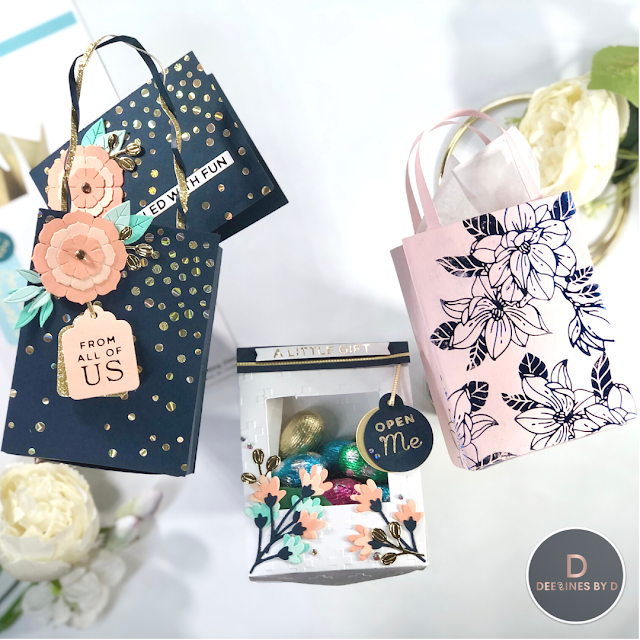
GIFT BAG 1

For this Bag and mini card I started by using the Gift Bag Die to cut the handle and bag twice out of Navy Blue cardstock. This die will also emboss all of the fold lines, so I then folded along the lines (to see how to do this just click the YT video linked above). I used some strong double sided adhesive to attach the 2 sides of the bag together and then folded and adhered the bottom snugly. This forms the bulk of the bag. Then all that is left is the handles and decorating so it actually wouldn't be too hard to make a bunch of these as gifts for family members, to give away at school, or maybe even as small party favors!
I chose to make the handles a little fancy, so I also cut the handle twice out of Gold Glitter cardstock (I used the CS from the Spellbinders All Aboard card kit from last year!) I then cut these handles in half lengthwise and attached the blue strip to the gold strip with strong adhesive only at the end. I carefully twisted the strips around each other to create a decorative handle and again cut and adhered the ends together at the other end. I then adhered these to the gift bag and added a small piece of navy blue cardstock on top of the handle so the inside of the bag looks neat and so those handles are securely fastened to the bag.
I cut two pieces of the same navy blue cardstock to fit the front and back of the bag. I foiled them with the Spellbinders Slimline Confetti Background plate and Starburst foil and then adhered them to the bag. I die cut the flower from the I Dance Die set (also released this month) from light and dark peach cardstock and assembled it with my Bearly Art glue. I also die cut some sprigs from Sizzix Gold Mirror cardstock and light and dark green cardstock. I used the Celebrate You Glimmer plates and the larger square tag die from the Assorted Tags Die set to create the tag with Espresso Bean foil. These sets are nice because the plates are made to be used with the tags and fit nicely together. It also has a long strip that I die cut out of Sizzix Opulent Gold Matte cardstock to use a my paper string to attach the tag to the bag! I assembled all of these elements onto the bag front.
Then to complete this set, I cut a small card that would fit into the bag and foiled it as I did the panels on the bag so it would match. I added an identical flower with sprigs and I also foiled the Sprinkled with Fun sentiment from the Celebrate You Glimmer plates set with Espresso Bean Foil and added it to the front of the card. This works a perfect gift because you can easily fit a gift card in this little card and place it in the gift bag!
GIFT BAG 2

For this bag, I first foiled the Spellbinders Magnolia Blooms plate 4-5 times randomly on a 2 light pink pieces of cardstock (one for each side of the bag). I used Spellbinders Cobalt Blue foil and after the foiling, I used the Bag Die to cut out each side of the bag along with 2 handle strips from plain pink cardstock. I folded the embossed lines and assembled the bag as before using strong adhesive. This time I attached the handles using the cut strips, which also have a short embossed line at the ends to help you place the handles on evenly.
GIFT BAG 3

Finally, I decided with Easter on the way that I would create a treat bag with a window! I used Gift Bag die to cut 2 bag pieces out of white cardstock. To prevent losing those folds after dry embossing, I folded all of the embossed lines to get the shape of the bag without adhering the pieces together. Then I used the This Plus This embossing folder to emboss each bag piece. The great thing about this folder is that it is 5.5" x 8.5" and this means I can easily emboss larger pieces like these bag pieces! I'm so excited about this and this is why I feel like these embossing folders are a MUST HAVE! The best part is they are big enough to emboss larger pieces but still will fit through the standard sized die cutting machine! Folding the embossed lines first made it really easy to still fold and assemble the bag after embossing it with the folder.
Before I glued that bag together though, I did cut a small square out of the part of the bag that would be the front. I used a piece of acetate and adhere it to cover the square on what would be inside of the bag/the debossed side of the cardstock. Then I assembled and adhered the bag together. I die cut the little flowers from navy blue, dark and light peach and dark and light green cardstocks using the dies from the Spellbinders Glimmer Edge Flowers set (released last month). I also cut out a couple sprigs from the I Dance set from Gold Mirror Cardstock and I used these pieces to decorate the front of the bag.
I also foiled and cut the sentiment from the Celebrate You Glimmer Plates using Polished Brass Foil. And I created the tag with the same set and the circle tag from the Assorted Tags dies. I cut an extra rectangle from navy blue cardstock creating a score line in the center. I attached this to the top of the bag with some strong adhesive and adhered the "Open Me" tag underneath. Then all that was left to do was to add some goodies!! I chose some chocolate eggs for easter and then I adhered the other half of the navy blue rectangle to the back of the bag to seal this sweet treat!
As you can see, I also added some small gems for some shine and that is my inspiration for this gift bag set! I really love all the uses you can get out of the Gift Bag Die set and along with the Glimmer Sentiments and Tags, these products are ideal for use year round! All of the products have been listed below - Happy Shopping!
Also, don't forget to check out/follow me on my Instagram account @deezinesbyd. I will be posting reels of these and other creations featuring this months' Spellbinders release throughout the month!
Have a Crafty Day!
Supplies
(note: Any products not included here are linked within the blog text)


Comments
Post a Comment
Please leave me a comment as I always love hearing from you! 😃