Sam Poole's Shabby Basics Collection | Creative Expressions
Hello Friends and Crafters!
Sam Poole's Shabby Basics Collection at Creative Expressions was just released recently and I have a bunch of inspiration to share! I have two cards, a journal page and scrapbook layout and hope there's something you like in the mix. This collection is perfect for vintage-style projects and has a french twist. There are also some new gilding flakes which work perfectly with this style - I'm showcasing the Raspberry Kiss Gilding Flakes.
Scrapbook Layout
This scrapbook layout was solely inspired by the "French Corsets" script in the French Rose stamp set. I printed off a few vintage corset photos in black and white and matted them on black and red cardstock. I used a black Pigma Micron pen and drew a circle on my white layout using a circular box I have in my craft room. I added splatters of Distress inks in Aged Mahogany and Barn Door around the circle.
I also cut another large circle and stamped out the sentiments from the Dates From The Past stamp set in Vintage Photo Oxide ink. I adhered this to the dried layout, along with the photos. I stamped the French Corset stamp around the edges of the layout. I added the flowers that I cut and inked up using the Petite Fleur Madelaine dies. I used Crushed Olive and Walnut Stain for the leaves and Aged Mahogany and Barn Door for the flowers.
The sentiment was heat embossed in gold using a stamp from the CE Sweetness Heart stamp set . I also randomly added buttons diecut from red cardstock using the Buttons die set. And finally, I added Golden Rod Stickles to the flower centers, to simulate thread on the button centers and as random dots in the background.
Like what you're seeing? Click and save this for later on Pinterest!
There is more inspiration below - keep scrolling!
Journal
This journal page was made by randomly swiping the pages with Distress Oxide ink in Aged Mahogany, Victorian Velvet and Barn Door. I simply took the ink pads to the paper. I randomly stamped the French Rose stamp in Versafine Onyx Black ink. I also added the sentiments from the Dates From The Past stamp set. Since this has a vintage look to it, you can double stamp and it will still look good - so don't worry about errors.
The right page, clearly displayed the French Rose stamp and felt the left side needed something. So I used my Black Pigma Micron Pen and my White Sakura Gelly Roll pen to draw a tall bust normally use for dressmaking.
I used the Petite Fleur Madelaine die set to cut the flowers and leaves out of black, red, light pink and silver cardstocks. Then to give them a vintage look, I added some Cosmic Shimmer Acrylic glue to the edges of the petals and added some Raspberry Kiss Gilding Flakes. I did the same with the buttons I cut using the Buttons dies.
I assembled the flowers and added them on the pages along with the buttons, which I also used as flower centers. Finally, I added some Diamond Stickles to accent the stamped images and to make random dots in the background for interest.
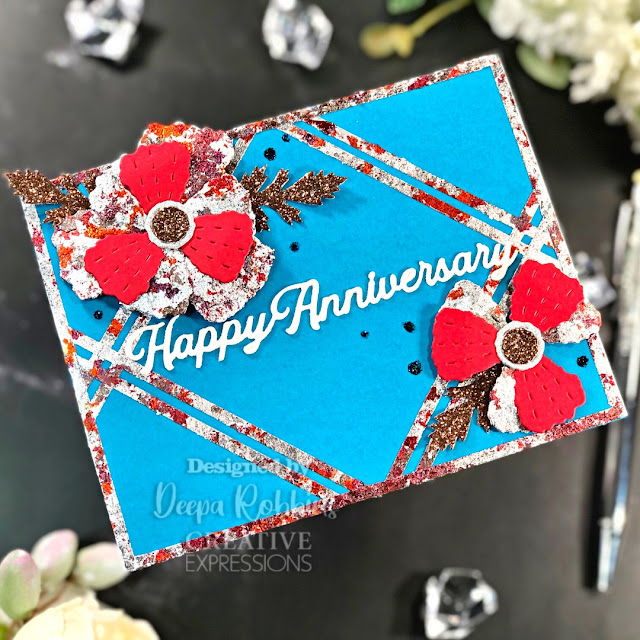
Anniversary Card
This card was made by adding strips of double-sided adhesive around the edges of the aqua cardstock panel (4 1/4" x 5 1/2") and to make the design in the center, which I measured with a ruler. I then removed the release paper for each strip and added the Raspberry Kiss Gilding Flakes.
I used the Petite Fleur Madelaine dies to cut the flowers and added glue to the bottom petals of each flower. Once the glue ws tacky, I added more gilding flakes. The leaves were diecut from brown glitter cardstock. The sentiment was added using the Jamie Rodgers Wedding Dies from the Sentiments Collection. Finally, I added some Black Diamond Stickles.
Button Thank You Card
This card uses the Button Dies in a different way. I cut the button dies from pink and peach cardstocks in plain and glitter versions. I then attached them to a dark blue cardstock panel (4 1/4" x 5 1/2") and drew in stems with a White Sakura Gelly Roll pen.
The sentiment was die cut from white and silver cardstock using the CE Thanks A Million Mini Expressions die. And then I added some white dots in the background for interest. This one wasa really simple one to do.
I hope you've been inspired to make something similar yourself. All of the products have been linked below for your shopping pleasure!
As always, thanks for stopping by. And don't forget to leave me a comment, as I love hearing from you! And don't forget to follow me on Instagram @deezinesbyd!
Supplies


.png)


Comments
Post a Comment
Please leave me a comment as I always love hearing from you! 😃