Die Cuts and Foil Gift Cards | Spellbinders Gift Products
Hello and welcome back to my blog!
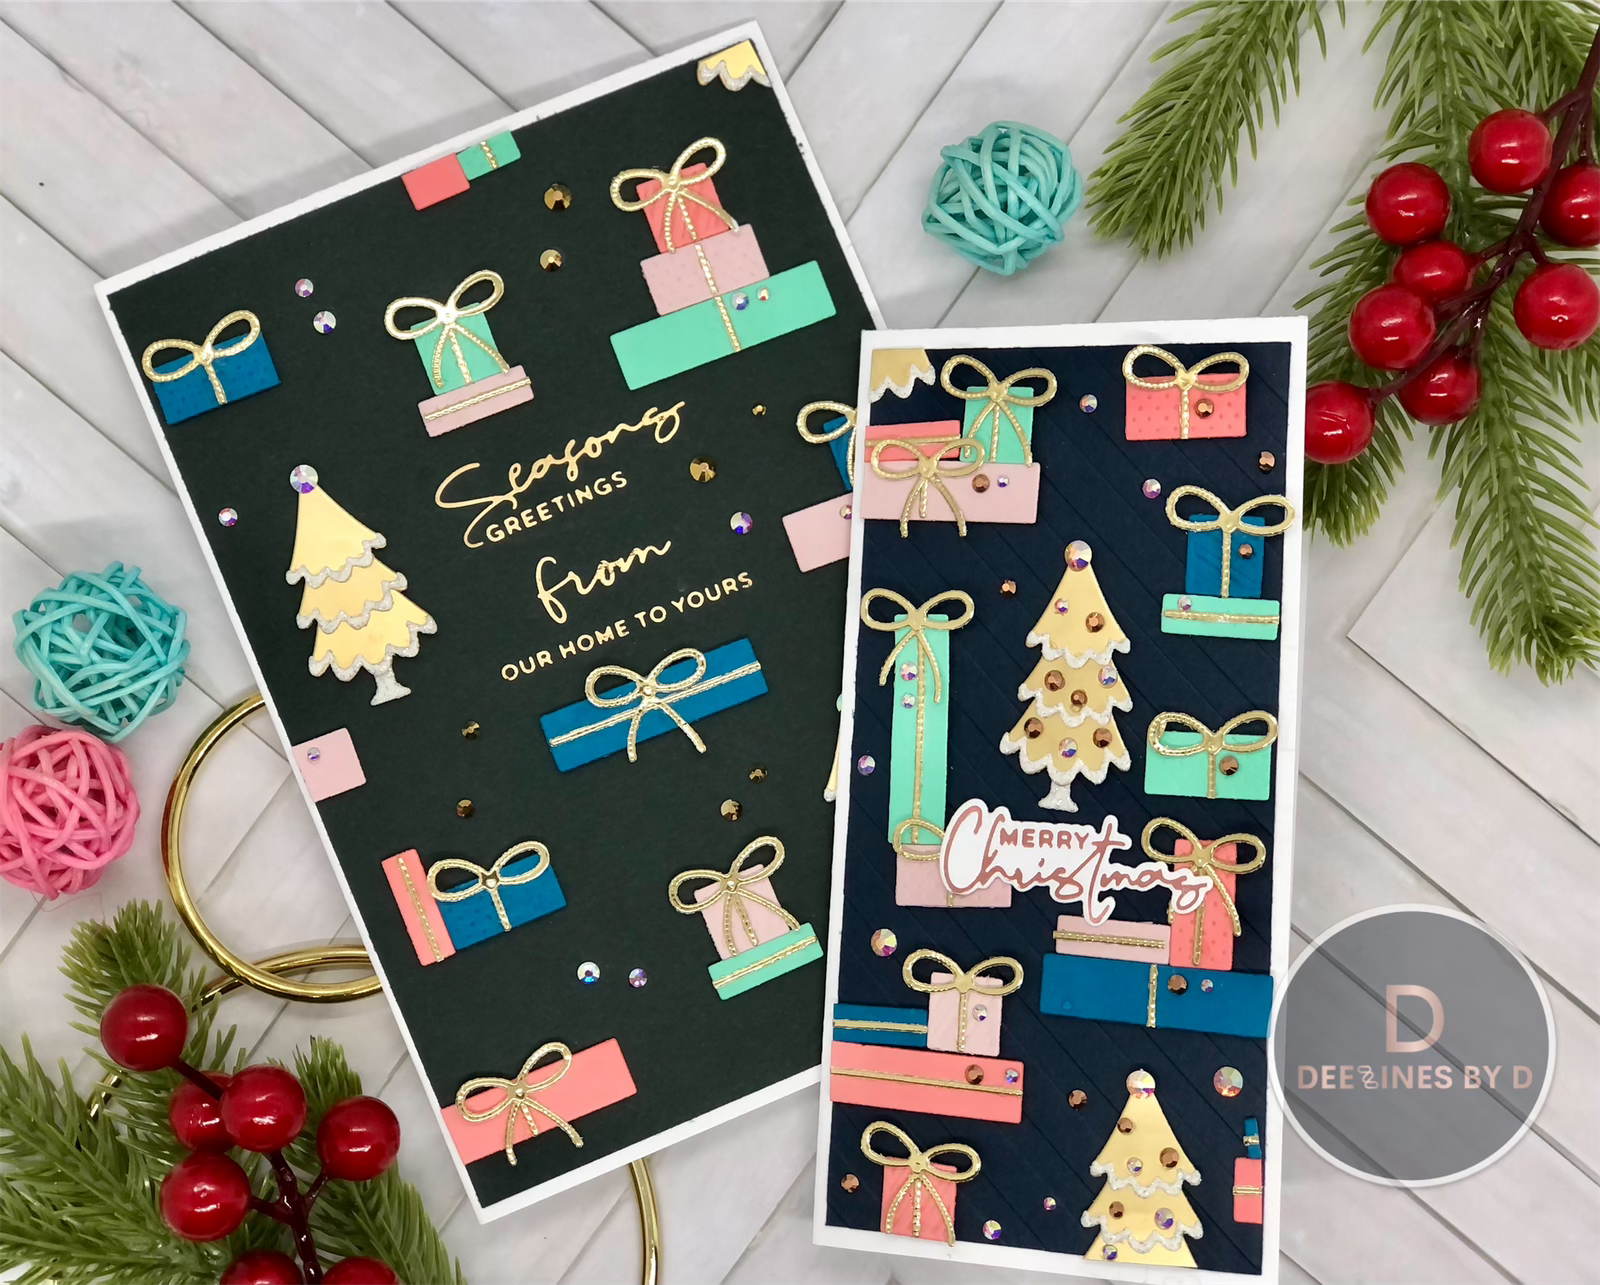
Today I have a Spellbinders heavy project for you. Lately I've noticed that there are a lot of products that Spellbinders seems to release that work together and have the same theme but are released separately or not necessarily as coordinating items. So, I chose the products which resembled presents or gift items. I've chosen some gift dies that are included in the All Aboard card kit, which was released a month ago, and the Glimmer Gift Border glimmer plate. I'll be using both items with a chosen colour palette to create today's two cards, decorating the outside and inside with these products that seem to coordinate so nicely.
VIDEO

I chose my colour palette of light green, pink, coral, blue and gold. And I chose to use dark blue and green for my background panel colours. I also created two of my own cardstocks but colouring my white cardstock with some Altenew Coral Bliss and Galactic Stream inks. It's important to note that when I do this I don't apply too much pressure to my ink pads, but instead, I gently move my ink pads across the cardstock. This prevents any damage to your ink pads.
I then used the gift dies and my Sizzix Sidekick to die cut the gifts out of each colour of cardstock. I made 2 sets in each colour and assembled them with the gold bows and string cut out of Sizzix Opulent Gold Mirror cardstock, seen below.

I then grabbed my Spellbinders Diagonal Stripes embossing folder and embossed add a 3” x 6” piece of Navy blue cardstock, making sure to apply a spritz of water before putting it through my die-cut machine. This just helps the paper take on the shape of the embossing folder without tearing and is recommended for thicker cardstocks. Then I adhered the gift pieces onto the panel with foam squares. I also popped a few Christmas trees in there to break up the gifts – these are also from the All Aboard card kit. I used Sizzix Opulent Ivory Glitter and Matte Gold cardstock for these trees. The sentiment was foiled with Spellbinders Rose Gold foil using Yana’s Christmas Sentiments glimmer plates and dies. I added the sentiment with some foam squares and BearlyArt Glue and finished off the panel with AB Crystal and Gold LolliBead gems.

I also made another panel on a 4 3/4" x 6 3/4" piece of dark green cardstock. I first, foiled this panel with Spellbinders Aura Foil and Yana’s Christmas Sentiments glimmer plates. The first time I foiled this panel, there was some under foiling and so even after I removed my plate, I decided to re-foil. You might be thinking, oh no you removed your plate so how can you foil again and prevent inaccurate foiling, which would ruin my panel? Well, it's simple. Since we apply pressure to the panel in our die-cut machine, an indentation is left in our cardstock. So I can use that indentation to easily line up my plate again. I simply place my plate on top of the indentation and slightly jiggle it to make sure it's in the slot and does not move. This is how I know it is in the correct place. I then tape it down in a hinge fashion with some washi tape, add my foil, and glimmer away for a perfect re-foiling job! To see this in action, or for a better explanation, please see my YouTube video linked above! It takes a bit of practice but once you have it down you will be an expert foiler!
Once foiled, I arranged and adhered my gifts and Christmas trees in the same fashion as before. This time I placed the gifts a little farther apart and this created a bit of a different look, which I like!

For the card inside I used the Glimmer Gift Border glimmer plate and some Spellbinders Matte Gold foil to foil the plate twice on the left hand side of my card. I did this on the smaller 6 1/2" x 6 1/4" center folded mini slimline card base very easily. This works for me and I'm able to get this through my die cut machine because I have the larger Sizzix BigShot Plus. I don't think this is possible with a smaller die-cutting machine since the second time you foil the plate it has to be placed in such a way that it won't fit through. If you have this problem, you can always foil the image on a separate piece of cardstock and add it to you card inside. Or you could cut two pieces of card stock and attach them with a lip for your card base. When I went to glimmer this plate on the larger 10" x 7" center folded A7 card base, I had a hard time trying to foil the late a second time because of the issue outlined above. So I glimmered it as best I could, which left a bit of the border not foiled. Instead of scrapping this, I chose to stack some more gift dies to create a big bundle of gifts and covered up this mistake on my card, shown below.

Finally, I stamped out my sentiments on the card insides. I used the Altenew Holiday Wishes Stamp Set for the mini slimline card and used masked stamping to stamp this in VersaFine Clair Nocturne ink and Altenew Galactic Stream ink. I used the Altenew Blessings Stamp Set for the 5" x 7" card using the same stamping technique and inks. I adhered the card panels/fronts to the card base with some Tombow Mono Dot Runner and double sided tape.


Comments
Post a Comment
Please leave me a comment as I always love hearing from you! 😃