Thread & Dimension | Spellbinders Spring Into Stitching Collection
Hello Crafters!
I have some more Spellbinders inspiration to share with you from the Spring Into Stitching Collection available in the Spellbinders' store now! I have 3 card ideas to share with you today - I hope you like them!

All of these products can be found in the product list at the end of this post. Please feel free to click and shop. These are affiliate links, meaning that if you click on them and purchase something, I will earn a small commission at no additional cost to you. It simply helps me keep bringing you more inspiration! I appreciate any and all support - Thank you! 💜
I've included a YouTube Video Tutorial below, if you are interested!
Watch the Video on YouTube

Like what you're seeing? Pin this picture for later on Pinterest!
CARD 1

For this first card, I used the Stitched Kaleidoscope Strip Dies to cut each strip from dark grey (bottom layer), Sizzix Opulent Rose Gold Pearl (middle layer) and light pink cardstocks (top layer). I used my DMC Needle and Silver Metallic thread to stich the ovals of the grey bottom layer (for a better method for stitching, along with some tips and tricks, click the YT video linked above!) I then glued together the three layers of the kaleidoscope strip. This strip is nice because it can be use with slimline cards since it is so long.
I used the Spellbinders Geo Screen embossing folder to emboss a 4.75" x 6.75" Grey cardstock panel. I then cut a 5" x 7" landscape top folding card base and positioned the kaleidoscope strip and embossed panel on the front to determine how high I wanted the design. I left a white portion of the card base showing and marked this with a pencil. I used the pencil line to line up the Happy Birthday sentiment from the We Dance Glimmer Plates set and foiled it with more Pewter foil. I erased the line and then attached the embossed panel and the kaleidoscope strip with strong double sided adhesive. I cut off and over hanging pieces.
I foiled 2 flowers using the Spellbinders Glimmer Edge Flowers plates on light pink cardstock with Pewter foil and cut them out with the coordinating dies. I assembled the flowers with my Bearly Art glue. I then cut out some more floral and foliage elements using Spellbinders Petite Floral Potpourri, Be Bold Blooms and Christmas Blooms die sets. I cut these out of Sizzix Opulent Charcoal Metallic, Ivory Glitter, Silver Mirror and pink glitter cardstock. I arranged all of these die cut pieces on the left hand side of the kaleidoscope border with one flower and adhered them. I then embellished the front with Pinkfresh Studio Ballet Slipper jewels and some AB Crystal gems.
CARD 2
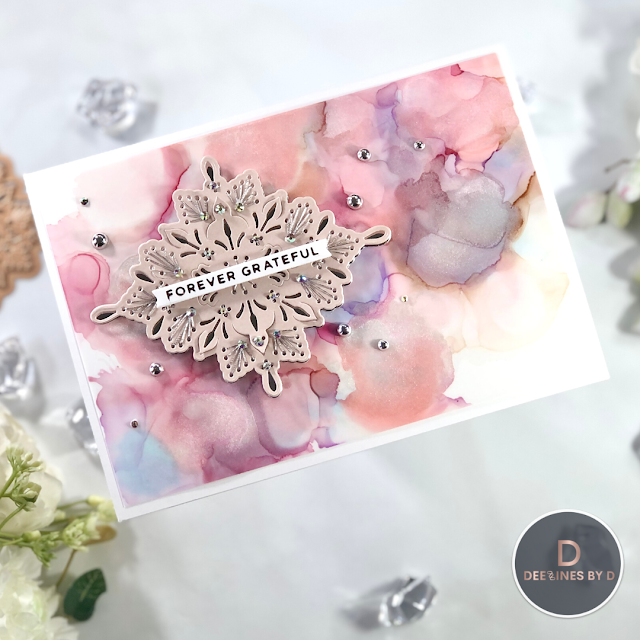
For this card I started by making the background so that I could let it dry while stitching the medallion. I used an A2 sized piece of Translucent YUPO paper. I added blending solution first to the YUPO and then added drops of Ranger alcohol inks in Cool Peri, Shell Pink, Pebble and Pearl Mixative. I used a blowing tool to move the alcohol inks around the paper and made sure it covered most of the panel. I find that adding the pearl mixative gives these regular inks a pearl shimmer since the mixative mixes with the colours unlike the alloys. This really took me no time at all, I didn't add too much of the inks as I wanted the colours to be light. I set this panel aside to dry.
Then I took the Spellbinders Stitched Medallion dies and lined them up (one inside the other) and taped them together with washi tape. I cut a medallion out of Sizzix Opulent Rose Gold Pearl cardstock and then I used the outline die separately to cut a solid piece out of Silver Mirror cardstock. I used the DMC Needle and Silver Metallic thread to stitch the Medallion in the desired areas. Now keep in mind that you don't have to stitch everything or anything at all. You could just use this die cut piece without any thread and jazz it up with some jewels. I completed the stitching and adhered the medallion onto the silver solid piece with foam squares underneath the threading.
By now the alcohol ink background was dry (especially since I didn't use too much ink). I cut it down to size to allow for a small border when matted on the white card base. I attached it to an A2-sized top folding landscape card base and only added adhesive behind the area I was planning to put the medallion on and in areas of more alcohol ink. Keep in mind that this panel is translucent and so you will see adhesive through any white or lightly inked areas. I then turned the medallion on its side and added it to the top left corner of the card. I foiled a sentiment strip from the Mini Everyday Sentiments Set with Blush Foil and attached this with a foam strip to the center of the medallion. To complete this card, I added some Metallic Pearl embellishments on the background and some AB crystal jewels on the medallion. Furthermore, there are little cuts in the medallion that you can bend/curve forward a bit to create more dimension.
CARD 3

For my final card, I simply cut the Spellbinders Stitched Petal Frame from Silver Metallic cardstock. I then spent some time stitching this frame with various colours of peach, pink, purple and blue floss. It's important to note that when using floss for stitching these die cuts, you only need to use 2-3 threads from the floss (they usually come as one thick string comprised of 6 threads). The reason why is that too much thickness will eventually tear the hole that is repeatedly stitched. For example, many of these designs have one hole you have to go through many times to reach others, like the center of a flower burst or the bottom of a petal. This will make more sense once you get started stitching. I highly recommend that if you are new to these stitching dies and lack the supplies, to check out the Spellbinders floss, metallic threads and DMC Needles which I have linked in the supplies list below. It's a little bit of everything to help you get started.
Once my stitching was complete, I used foam squares to attach the frame to a navy blue piece of cardstock of the same size. I had some pattern paper laying around so I actually used this and cut it about 1/4" larger than the frame and attached it to a white side-folding card base. I adhered the frame with the navy cardstock on top and added the Heartfelt Thoughts sentiment strip that I had foiled with Rose Gold Foil using the Celebrate You Glimmer Hot Foil Plate set. To finish this card off, I added some coloured jewels to various areas of the petal frame trying to match the colours of the floss used.
And that is my card inspiration for the Spring Into Stitching Collection! All of the products used here have been listed below - Happy Shopping!
Also, don't forget to check out/follow me on my Instagram account @deezinesbyd. I will be posting reels of these and other creations featuring this months' Spellbinders release throughout the month!
Have a Great Day!
Supplies
(note: Any products not included here are linked within the blog text)


Comments
Post a Comment
Please leave me a comment as I always love hearing from you! 😃