A place to share all of my creations from cards: inside and out, to scrapbook layouts and anything else that may inspire creativity!
Get link
Facebook
X
Pinterest
Email
Other Apps
Scrap N' Stamp For the Boys Inspiration Hop | Masculine Cards
Hello Crafters!
Welcome to the Scrap N' Stamp For The Boys Hop! I'm so excited to share these 6 cards that I made with a masculine influence, using stamping foam and layered stencils. You can see I snuck in a not-so-conventional masculine coloured card, but I was dying to try a sunset coloured scene and some could argue that this could work as a masculine card too. I mean, who am I to say purple, orange and yellow are not masculine colours! 😜
GIVEAWAY ALERT!!
Scrap N' Stamp will be giving away a $50 Gift Certificate to the SNS Shop to one individual hopping along! Make sure to comment on my blog post below for your entry to win!😃
The winner will be chosen randomly and posted on the Scrap ‘N Stamp blog
Here's a YouTube Video Tutorial, if you are more into watching rather then reading!
👇Watch the YouTube Tutorial Here! 👇
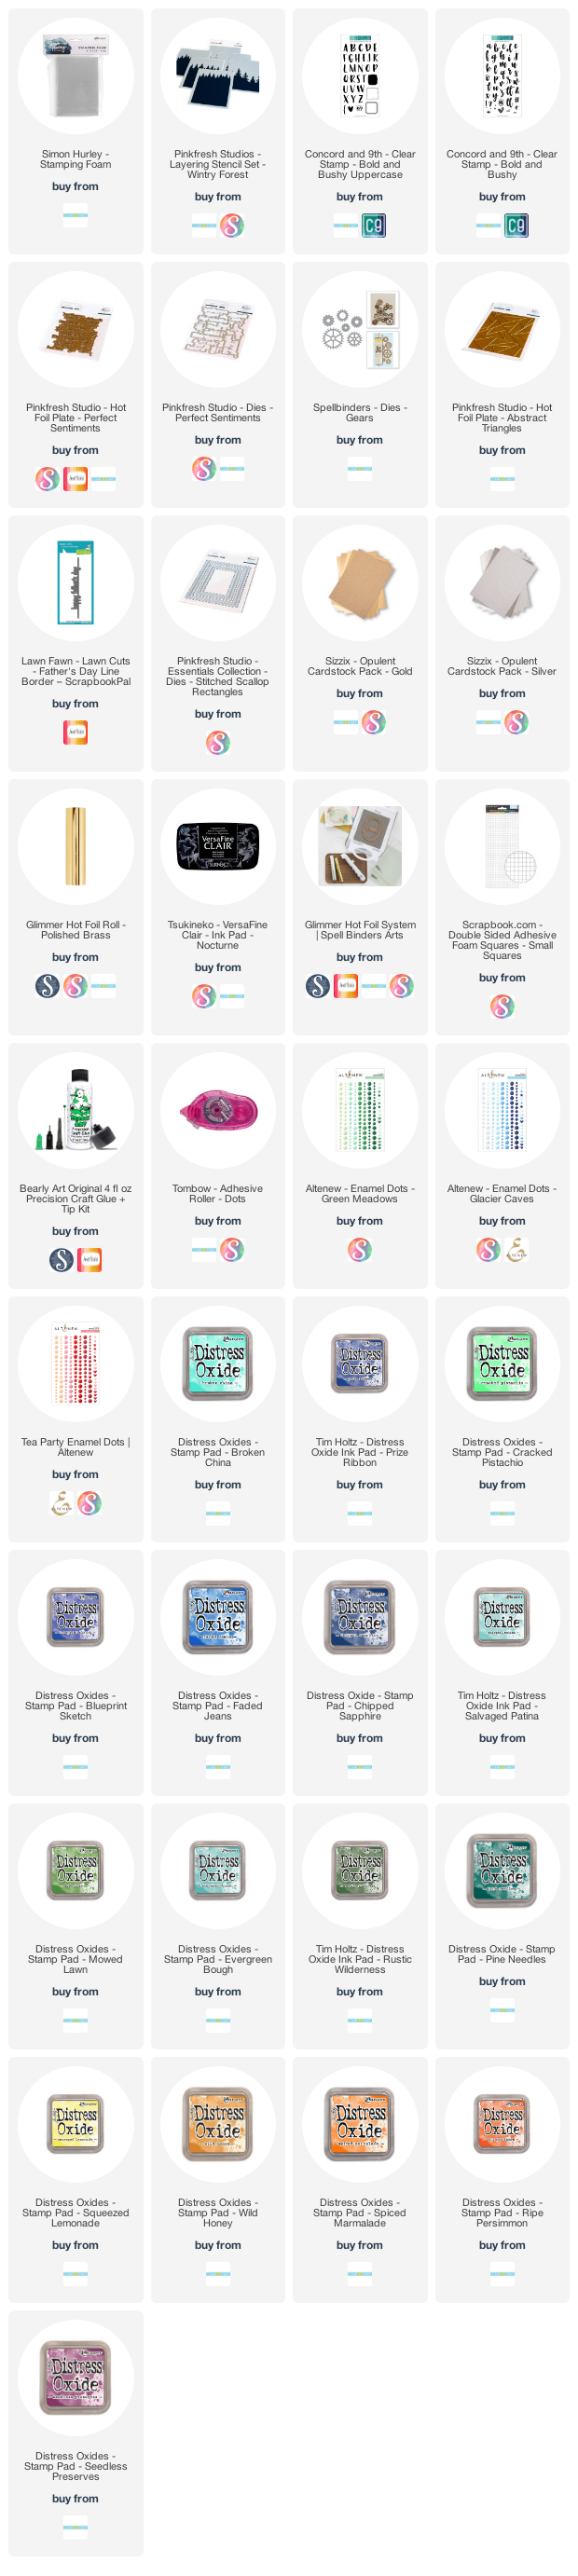
I created 4 quick cards using Simon Hurley's Stamping Foam. This item has been around for a while now but if you've never heard of it, this tool is ingenious!! You simply heat the foam to make it pliable, apply it to whatever pattern you want (for example, a stamp, stencil, embossing folder or any physical item), add ink and then stamp it out. It's easy to clean and the best part is that it's reusable!! All you have to do is reheat the foam and it loses the previous pattern returning to a flat foam, ready to be imprinted with another pattern. And better yet, these foam pads are available in the Scrap N' Stamp shop in packs of 4 (links below)! So even if you make some sort of error with one foam, there are more to use!
I chose to make 4 backgrounds using 4 different items to show you the range of use of these foams!
1) Embossing Folder
I used the We Are Memory Keepers Geometric embossing folder for this method (unfortunately I think this item is discontinued but this will work with any folder). I left the folder open and used my heat tool to heat the foam. I heat the entire area of the foam for 10-15 seconds. Then I put the foam, heated side down, and used my MISTI to apply even pressure while pushing the foam into the folder for 10 seconds. I removed my foam and it took on the imprint of the folder. I then added Oxide inks in Broken China and Prize Ribbon and stamped the foam onto the center of an A2 sized white cardstock panel. Then I used a water mist bottle and towel to wipe away the ink from the foam.
2) Dies
Again, I heated my foam after placing the various gears from the Spellbinders Gear Die Set in the arrangement I wanted them flat on my table top. I pressed the heated foam into the gears using my MISTI and lifted it to reveal the imprint, which was incredibly detailed to my amazement! I added Oxide inks in Mowed Lawn, Rustic Wilderness and Pine Needles and stamped it onto an A2 sized white cardstock panel. I cleaned the foam just like before.
3) Foil Plate
I heated my foam and pressed the heated foam into the Pinkfresh Studio Abstract Triangles foil plate using my MISTI and lifted it to reveal the imprint. I added Oxide inks in Cracked Pistachio and Blueprint Sketch and stamped it onto an A2 sized white cardstock panel. I cleaned the foam just like before.
4) Mesh/Wire Craft Drawer
Finally, I heated my foam and pressed it into the mesh wire of my craft drawer which I thought had a neat pattern. Again, I used my MISTI to apply equal pressure and lifted it to reveal the imprint. I added Oxide inks in Stormy Sky and Chipped Sapphire and stamped it onto an A2 sized white cardstock panel. And I cleaned the foam and reheated it to remove the imprint before storing it back in the resealable bag it comes in.
This process quite literally took me 10-15 at most and I was left with 4 quick backgrounds that I just needed to cut down and finish with sentiments. For 3 cards I added sentiments that I had pre-foiled in Spellbinders Polished Brass, Gold and Aura Foil, and cut using the Pinkfresh Studio Perfect Sentiments plate and die. For the background made from the craft drawer, I used the Lawnfawn Father's Day Line Border die with Sizzix Opulent Silver Mirror Cardstock. I also added frames that I had cut from Sizzix Opulent Gold and Silver cardstocks using the Altenew Fancy Rectangles dies and Pinkfresh Studio Scalloped Rectangles dies.
For the last two cards, I used the Pinkfresh Studio Wintry Forest layering stencils. This set creates a wintry forest scene, made especially for Christmas, but if you skip the snow stencil (which is the last stencil) you get a nice forest scene. Then you can choose masculine colours to create your forest.
I created one card with obvious masculine colours - greens. There are 6 stencils in this set, so without the snow stencil, you need 5 colours. I used Oxide inks in Salvaged Patina, Mowed Lawn, Evergreen Bough, Rustic Wilderness and Pine Needles. I finished off this card by stamping out "Dad" in Versafine Clair Nocturne ink using the Concord & 9th Bold and Brushy Lowercase and Uppercase Stamp sets. For the second card, I was itching to make a sunset which I thought would also make a relaxing masculine card (which can be argued - you can stick to more conventional masculine colours if you see fit). I made it the same way as the first card but this time I used Oxide inks in Squeezed Lemonade, Wild Honey, Spiced Marmalade, Ripe Persimmon and Seedless Preserves. I finished this card off with the "celebrate" sentiment that I had pre-foiled in Spellbinders Polished Brass Foil and cut using the Pinkfresh Studio Perfect Sentiments plate and die.
Finally, I adhered the cut and stamped panels onto Blue and Green cardstocks. I embellished all of these cards using the enamel dots from Altenew sets: Green Meadows, Glacier Caves and Tea Party.
To be accurate, these cards only took me 2 hours and that's why I was able to make so many to share with you today! Thanks again for stopping by and please remember to comment for your chance to win!
Here is the full hop list! Have fun hopping along!
Sorry, I'm lucky to get into YouTube hops and did not have any luck on the others for the hop. I did see a comment above that some were just articles and not all were videos. Confusing for non-geeks! Some I could guess at to see if it was part of your hop, but YouTube posts the hop underneath the video so I can see I'm in the correct video for the correct card. The identification just didn't pop out to me. Sorry! Thanks for all the trouble you went to to get this together and sorry I'm not smart enough to figure the rest of it out! Thanks for writing back too.
What an amazing set of cards for the hop! I've had the stamping foam for an embarrassingly long time without trying it yet, thanks for the inspiration!
that really nice stuff if you looking for discounted gift card deals then do consider giftcardoutlets.com which has huge category collection to offer you the best discount. visit Gift Card Outlets
All of your cards are so beautiful. My favorites are the trees! There is just something that makes a person happy to see a beautiful sunset. I love your color choices, awesome cards!
.png)


.png)


Sorry, I'm lucky to get into YouTube hops and did not have any luck on the others for the hop. I did see a comment above that some were just articles and not all were videos. Confusing for non-geeks! Some I could guess at to see if it was part of your hop, but YouTube posts the hop underneath the video so I can see I'm in the correct video for the correct card. The identification just didn't pop out to me. Sorry! Thanks for all the trouble you went to to get this together and sorry I'm not smart enough to figure the rest of it out! Thanks for writing back too.
ReplyDeleteOh no problem! Glad you could find the blog! Thanks again!
DeleteThe trees look awesome! I love the colors you used. These are just amazing looking.
ReplyDeleteThank you! 💕
DeleteThese are all wonderful, I especially love the trees!
ReplyDeleteThank you💕
Deleteoooh love how you used the Simon Hurley foam - amazing look - must purchase for my stash now - lol - thanks for sharing
ReplyDeleteThank you! 💕 That foam is so versatile - happy crafting! 💕
DeleteWhat an amazing set of cards for the hop! I've had the stamping foam for an embarrassingly long time without trying it yet, thanks for the inspiration!
ReplyDeleteThank you! I know what you mean, I’ve been meaning to try it and it’s amazing!
DeleteSuch gorgeous cards! Love all the different designs!
ReplyDeleteThank you💕
Deletewow love all your amazing cards..
ReplyDeleteThank you💕
DeleteAll of your cards are beautifully done with so many wonderful designs.
ReplyDeleteThank you so much💕
DeleteThat stamping foam is amazing...love all the cards you created.
ReplyDeleteThank you! Yes it so great!
DeleteEspecially love the trees. Have already added the stencils to my wishlist! lol
ReplyDeleteThanks! They are stunning and you can use them for Christmas cards too - such a bonus! 😃
DeleteWOW! An array of amazing cards! So cool that one key product resulted in all these different looks!
ReplyDelete~carol
Thank you Carol💕
Deletethat really nice stuff if you looking for discounted gift card deals then do consider giftcardoutlets.com which has huge category collection to offer you the best discount.
ReplyDeletevisit Gift Card Outlets
Thank you💕
DeleteAll of your cards are so beautiful. My favorites are the trees! There is just something that makes a person happy to see a beautiful sunset. I love your color choices, awesome cards!
ReplyDelete